
Photo by Max Bender on Unsplash
WordPress 的主要性能瓶頸是由處理 PHP 引起的,因此為提高我們網站的性能,我們需要減少 Web 主機處理 PHP 和數據庫的數量。
這個就是為什麼要在 WordPress 加入頁面快取的目的。
內容目錄:
- 頁面快取 (Page Cache)
- Nginx FastCGI cache 與 Varnish cache
- 在 Nginx 中啟用 FastCGI Cache
- 在 WordPress 中啟動清除快取外掛
- 配置 Nginx 以啟用 Nginx fastcgi cache
- 驗證 Nginx fastcgi cache 是否正常工作
- 負載測試
頁面快取 (Page Cache)
WordPress 快取方式其中的一種,可參考之前寫的「WordPress 的核心緩存概念」
https://yungke.me/core-caching-concepts-in-wordpress/
一些快取外掛都可以達成頁面快取目的,如:WP Rocket / W3 Total Cache / WP Super Cache / Cache Enabler,而我個人偏愛 Nginx FastCGI cache 方式,省去使用一個外掛安裝。
Nginx FastCGI Cache 的工作原理類似 Squid 的快取功能,把 URL 及相關組合當做一個 Key,用 Md5 算法對 Key 進行哈希,得到硬碟上對應的哈希目錄路徑,進而將快取的內容保存在該目錄內。
保存的目錄位置會在 /var/run/nginx-cache 目錄內。
這樣的快取好處:
快取 fastcgi 生成的內容,很多情況是 PHP 生成的動態的內容,少了 Nginx 與 php 的通信的次數,更減輕了 PHP 和數據庫的壓力。
早期大家不愛用 Nginx FastCGI Cache 的快取方式,是因為快取服務只能為指定 URL 或狀態碼設置過期時間,不支持指令手動清除快取,造成很多不便;現在我們可以通過 Nginx 的模組 ngx_cache_purge 來清除指定 URL 的快取,或使用 Nginx Helper 或 Nginx Caching 外掛來實現。
https://wordpress.org/plugins/nginx-helper/
Nginx Caching 外掛
https://wordpress.org/plugins/nginx-cache/
可以在主機後端做的工作,就不要推到網站前端來做。
Nginx FastCGI cache 與 Varnish cache
說到 Nginx FastCGI Cache 就不能不提 Varnish 了,Varnish Cache 是備受推崇的 Web 應用程序加速器,利用 HTTP 反向代理,快取任何頁面請求的返回內容,運作方式與 Nginx FastCGI cache 大致上相同。
Varnish 速度真的很快、很快 !
但是我使用 Nginx 系統,並沒有選擇 Varnish cache 作為快取選項,由下面 2 張的運作結構圖,就可以知道我選擇了 Nginx FastCGI Cache 沒有選擇 Varnish 的原因。
Nginx FastCGI Caching and Redis 服務架構

Nginx, Varnish Caching and Redis 服務架構

我的 WordPress 網站已配置 Let’s Encrypt SSL 加密,如果要使用 Varnish 加速,我需要 Nginx 在前面接收 80 與 443 的請求,然後再將它們傳遞給 Varnish 快取,我們可以將 Nginx 用於此目的,但是有必要為了 Varnish 加速快速,增加主機的複雜性,思考是否值得這麼做。
另一方面,在主機的維護上,盡量可以簡單性、穩定性去建置,即使出了錯誤,也能很快速的找出問題所在。
在 Nginx 中啟用 FastCGI Cache
如果您使用 EasyEngine 或 Webinoly LNMP 安裝包建置 Linux 系統,啟用 Nginx FastCGI cache 是一件很容易的事,執行以下的指令和啟用外掛,這樣就可以了。
EasyEngine
ee site create example.com --wpfc #wordpress + nginx fastcgi_cacheWebinoly
sudo site domain.com -wp -cache #wordpress + nginx fastcgi_cache + redisPS. Webinoly 在 1.5.0 版本中,把 redis (Object cache) 也加入了 wordpress 快取配置中。
在 WordPress 中啟動清除快取外掛
然後在 wordpress 控制台,將 Nginx Helper 和 Redis Object Cache 外掛都啟動。
Nginx Helper 設置:
設置一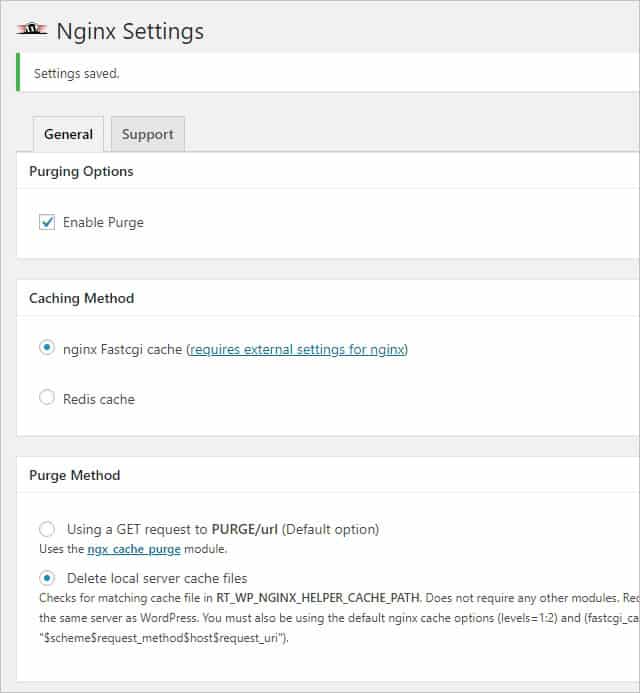
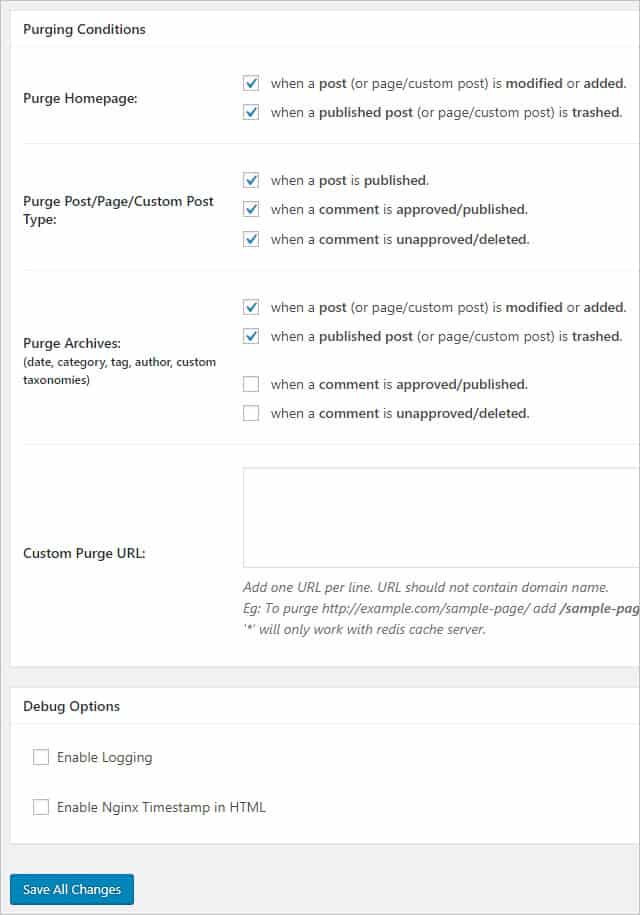
設置二
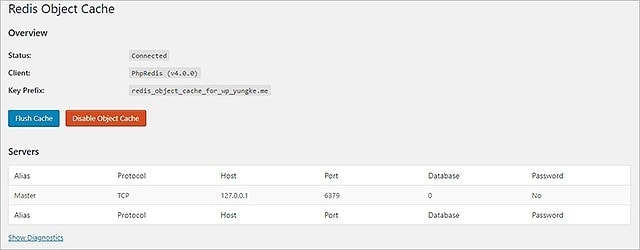
Redis Object Cache 設置:
配置 Nginx 以啟用 Nginx fastcgi cache
如果您是自己建置 LNMP 系統 (不是 EasyEngine 或 Webinoly 系統),若要啟用 Nginx fastcgi cache 功能,我們需要對 Nginx 服務器配置進行一些更改。
以當前默認的虛擬主機文件為例:
vi /etc/nginx/sites-available/default配置文件範例:
fastcgi_cache_path /var/run/nginx-cache levels=1:2 keys_zone=WORDPRESS:100m inactive=60m;
fastcgi_cache_key "$scheme$request_method$host$request_uri";
fastcgi_cache_use_stale error timeout invalid_header http_500;
fastcgi_ignore_headers Cache-Control Expires Set-Cookie;
快取的位置 (/var/run/nginx-cache) 可以設置硬碟上的任何資料夾,建議在 Ubuntu 中選擇 /var/run 文件夾,因為它是作為 tmpfs 的掛載的,從記憶體中讀取快取。
跳過 Nginx 不快取某些頁面:
set $skip_cache 0;
# POST requests and urls with a query string should always go to PHP
if ($request_method = POST) {
    set $skip_cache 1;
}
if ($query_string != "") {
    set $skip_cache 1;
}
# Don't cache uris containing the following segments
if ($request_uri ~* "/wp-admin/|/xmlrpc.php|wp-.*.php|/feed/|index.php|sitemap(_index)?.xml") {
    set $skip_cache 1;
}
# Don't use the cache for logged in users or recent commenters
if ($http_cookie ~* "comment_author|wordpress_[a-f0-9]+|wp-postpass|wordpress_no_cache|wordpress_logged_in") {
    set $skip_cache 1;
}
PHP 配置中輸入以下參數:
fastcgi_cache_bypass $skip_cache;
fastcgi_no_cache $skip_cache;
fastcgi_cache WORDPRESS;
fastcgi_cache_valid 60m;
add_header X-FastCGI-Cache $upstream_cache_status;
add_header 參數是為服務器響應添加了一個額外的標頭,方便我們可以檢查確定是否從快取中提供請求。
完整的 Nginx conf 的配置如下:
fastcgi_cache_path /var/run/nginx-cache levels=1:2 keys_zone=WORDPRESS:100m inactive=60m;
fastcgi_cache_key "$scheme$request_method$host$request_uri";
fastcgi_cache_use_stale error timeout invalid_header http_500;
fastcgi_ignore_headers Cache-Control Expires Set-Cookie;

server {
    listen 80;
	listen [::]:80;

	server_name example.com;

	root /var/www/example.com/htdocs;
	index  index.php index.html index.htm;

	set $skip_cache 0;

	if ($request_method = POST) {
    set $skip_cache 1;
    }

	if ($query_string != "") {
    set $skip_cache 1;
    }

	if ($request_uri ~* "/wp-admin/|/xmlrpc.php|wp-.*.php|/feed/|index.php|sitemap(_index)?.xml") {
    set $skip_cache 1;
    }

	if ($http_cookie ~* "comment_author|wordpress_[a-f0-9]+|wp-postpass|wordpress_no_cache|wordpress_logged_in") {
    set $skip_cache 1;
    }

	location ~ \.php$ {
    try_files $uri =404;
    include fastcgi_params;
    fastcgi_pass php;
    fastcgi_cache_bypass $skip_cache;
    fastcgi_no_cache $skip_cache;
    fastcgi_cache WORDPRESS;
    fastcgi_cache_valid 60m;
    add_header X-FastCGI-Cache $upstream_cache_status;
    }

	location ~ /\. {
	deny all;
	access_log off;
	log_not_found off;
    }

	location ~ .*\.(gif|jpg|jpeg|png|bmp|swf|flv|ico)$ {
    expires 30d;
    access_log off;
    }

	location ~ .*\.(js|css)?$ {
    expires 30d;
    access_log off;
    }
}
保存並退出文件後,請檢查 Nginx 配置文件是否語法錯誤:
sudo nginx -t假設一切正常,請重啟 Nginx
sudo service nginx restart驗證 Nginx fastcgi cache 是否正常工作
利用 Chrome F12 來檢查 header 返回值

- HIT – 正確的 Nginx fastcgi cache 返回值
- MISS – 頁面未快取並由 PHP-FPM 返回值 (可重複刷新頁面,查看返回值為 HIT 或 BYPASS)
- BYPASS – 頁面已快取但是沒有提供快取版本。當它是我們指定繞過快取的頁面 (例如:管理頁面) 或用戶登錄時,會發生這種情況。
負載測試
使用 Linode 2G RAM 方案的 VPS 來做開啟 Nginx fastcgi cache 測試。
我們利用 Loader.io 免費方案 (10,000 clients / 1 min test)
選擇第 2 個測試項目持續 1 分鐘,每秒鐘 1000 個用戶。(每分鐘 60000 個訪問者),Loader.io 有 3 種測試方法,請見 Test Types 說明。
我們先使用一個沒有做快取的測試網站 (load.yungke.me),首頁有 10 篇帶有圖片的文章。
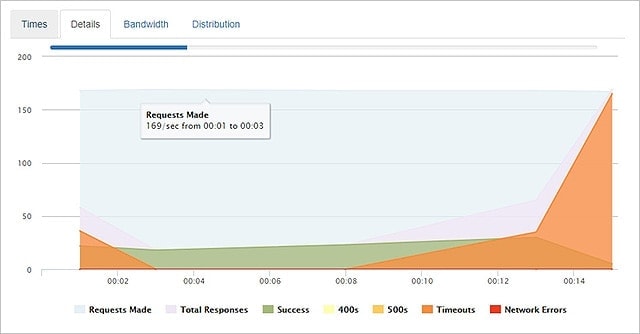
結果不易外,測試一開始沒幾秒,網站就已經打不開了,出現大量 Timeout 的錯誤。
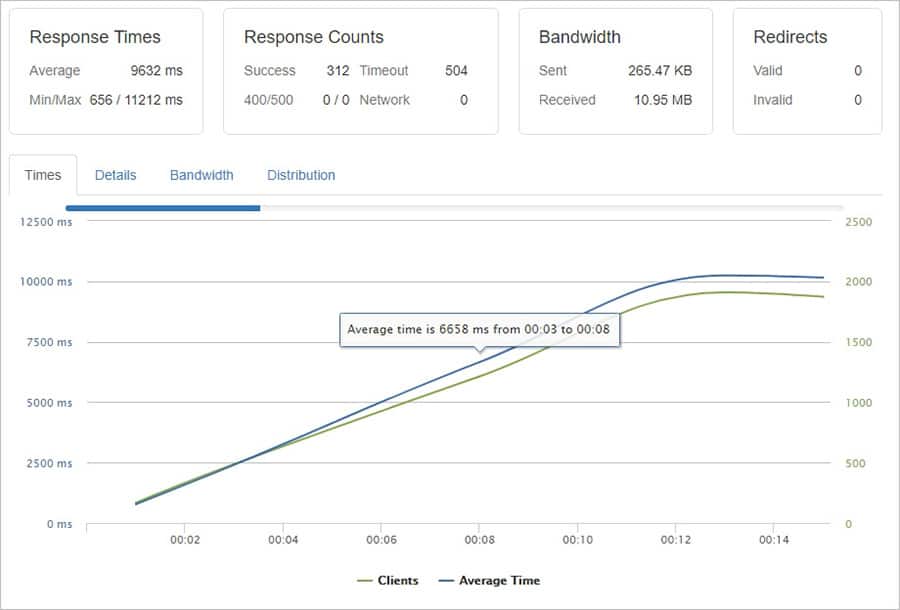
再來,測試網頁為 yungke.me,使用 Nginx fastcgi cache (頁面快取) + Redis Object Cache,一樣選擇第 2 個測試項目持續 1 分鐘,每秒鐘 1000 個用戶。(每分鐘 60000 個訪問者)
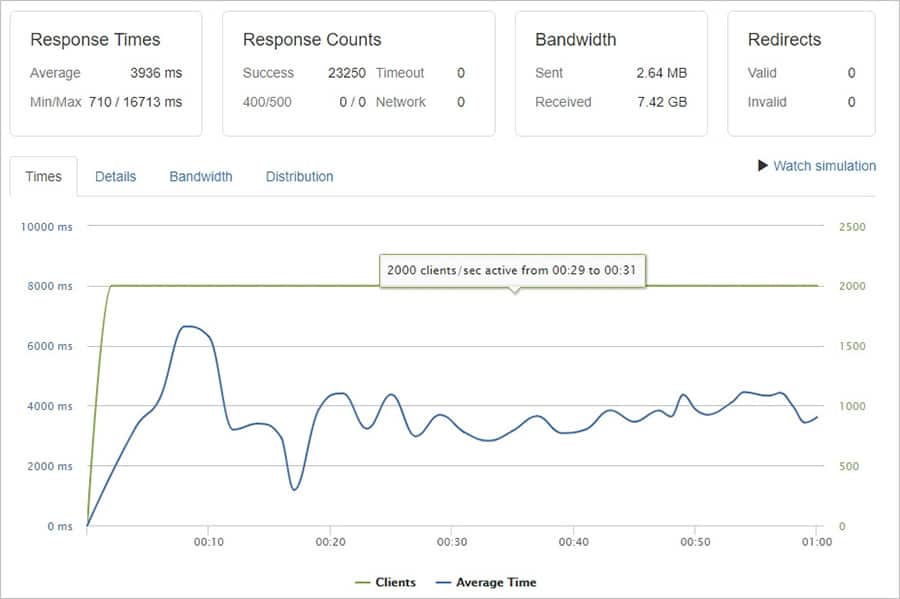
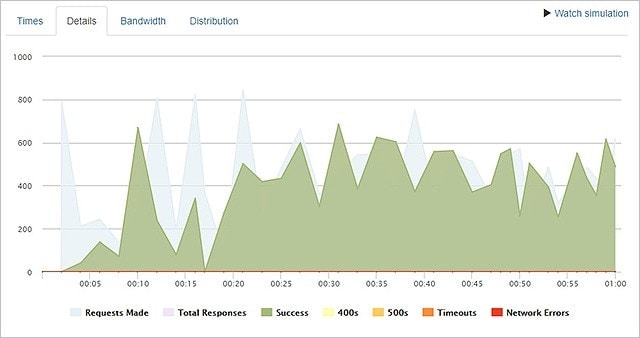
啟用 Nginx fastcgi cache 快取後,每秒 1000 個用戶,持續 1 分鐘,我們可以看到平均響應時間在 3936ms 上下,但是沒有錯誤率。
結語
以一個 2G RAM VPS 來說,開啟了 Nginx fastcgi cache + Redis 後的表現,是令我們所滿意的。
利用 Nginx 本身的輕量功能,再搭配 Redis Object Cache 對象快取,可建置一個低負載的網站,也可以這麼說:可以在主機後端做的工作,就不要推到網站前端來做。
2018/07/09 補充:
Redis 快取設置:
Redis 安裝後或使用 EE 及 Webinoly 安裝,Redis 的預設值是沒有限制快取的大小及快取計畫,需修改 /etc/redis/redis.conf 文件,符合我們的需求。
vi /etc/redis/redis.conf取消掉 maxmemory 前面的 # 號,修改如下:
maxmemory 128000000預設的快取計畫,取消掉 maxmemory-policy noeviction 前面的 # 號,修改如下
maxmemory-policy allkeys-lru保存文件後,重啟 Redis 服務。
sudo service redis-server restart
sudo service php7.0-fpm restart #或 php7.2-fpm
參考資料:
WordPress Caching Solutions Part 2
關於 fastcgi_cache
https://www.cnblogs.com/chenpingzhao/p/4983703.html


發佈留言