Photo by Shubham Dhage on Unsplash
PHP 於 5.6 版後,Debian / Ubuntu 預設都內建 Zend Opcache,Opcache 是 PHP 優化加速模組,PHP7.0 配合 Opcache 快取功能,更能提升 PHP7.0 的速度。
Webinoly 預設安裝,Opcache 已經啟用,預設值為 64MB,實際在 2G RAM VPS 運作中,有點不夠用,無法達到高命中率 (hits),修改 PHP 配置,優化 Opcache 性能。
內容目錄:
- 修改 opcache.ini 文件
- 安裝 Zend Opcache 網頁查看器
- 查看 Zend Opcache 運作狀態
修改 opcache.ini 文件
打開 /etc/php/7.1/mods-available/opcache.ini 文件
; configuration for php opcache module
; priority=10
zend_extension=opcache.so
加入下面的參數:
opcache.memory_consumption=512
opcache.max_accelerated_files=100000

;following can be commented for production server
opcache.revalidate_freq=0
opcache.consistency_checks=1
opcache.memory_consumption=512 //共享記憶體大小,請依你的 VPS 記憶體大小適當調整。
opcache.max_accelerated_files=100000 //最大快取的文件數目,預設值為 3000,可觀察 opcache 命中率來調整文件數目。
修改好 opcache.ini 文件存檔後,重啟 php 程式:
service php7.1-fpm restart安裝 Zend Opcache 網頁查看器
Opcache 實際運作快取狀態,可以利用瀏覽器來查看,網站的 PHP 快取是否有命中。
在你的 IP:22222 下新增一個 cache 目錄:
mkdir /var/www/22222/htdocs/cache
cd /var/www/22222/htdocs/cache
wget https://gist.github.com/ck-on/4959032/raw/0b871b345fd6cfcd6d2be030c1f33d1ad6a475cb/ocp.php
查看 Zend Opcache 運作狀態
開啟網頁瀏覽器,打入 http:// IP:22222
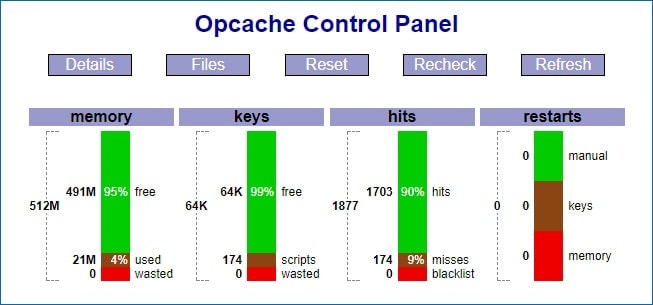
選擇 cache 目錄,點取 ocp.php,就可以看到 Zend Opcache 運作狀態,如下圖:

Webinoly 安裝 VPS 教學系列文章:
1. Webinoly 快速安裝 WordPress 教學
https://yungke.me/webinoly-easy-install-wordpress/
2. Webinoly 安裝後如何更改 PHP 版本
https://yungke.me/webinoly-change-php-version/
3. FastCGI Cache 快取 WooCommerce 的問題
https://yungke.me/woocommerce-shopping-cache/
4. Webinoly 的 Zend Opcache 性能優化
5. Webinoly 的 Memcached 性能優化
https://yungke.me/webinoly-memcached-optimization/
6. 阻擋 MJ12bot 惡意蜘蛛訪問
https://yungke.me/blocked-mj12bot-spider-access/
7. Webinoly 安裝 VPS 教學
https://yungke.me/webinoly-install-vps/
8. Webinoly 安裝 VPS 教學 – 進階版
https://yungke.me/webinoly-install-vps-advanced/


發佈留言